close
    • chevron_right

      Erlang Solutions: Guess Less with Erlang Doctor

      news.movim.eu / PlanetJabber · Thursday, 21 March - 08:30 · 13 minutes

    BEAM languages, such as Erlang and Elixir, offer a powerful tracing mechanism, and Erlang Doctor is built on top of it. It stores function calls and messages in an ETS table, which lowers the impact on the traced system, and enables querying and analysis of the collected traces. Being simple, always available and easy to use, it encourages you to pragmatically investigate system logic rather than guess about the reason for its behaviour.
    This blog post is based on a talk I presented at the FOSDEM 2024 conference.

    Introduction

    It is tough to figure out why a piece of code is failing, or how unknown software is working. When confronted with an error or other unusual system behaviour, we might search for the reason in the code, but it is often unclear what to look for, and tools like grep can give a large number of results. This means that there is some guessing involved, and the less you know the code, the less chance you have of guessing correctly. BEAM languages such as Erlang and Elixir include a tracing mechanism, which is a building block for tools like dbg , recon or redbug 
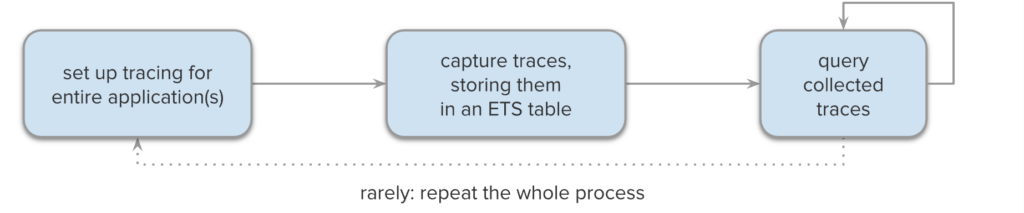
. They let you set up tracing for specific functions, capture the calls, and print them to the console or to a file. The diagram below shows the steps of such a typical tracing activity, which could be called ad-hoc logging , because it is like enabling logging for particular functions without the need for adding log statements to the code.

    The first step is to choose the function (or other events) to trace, and it is the most difficult one, because usually, we don’t know where to start – for example, all we might know is that there is no response for a request. This means that the collected traces (usually in text format) often contain no relevant information, and the process needs to be repeated for a different function. A possible way of scaling this approach is to trace more functions at once, but this would result in two issues:

    1. Traces are like logs, which means that it is very easy to get overwhelmed with the amount of data. It is possible to perform a text search, but any further processing would require data parsing.
    2. The amount of data might become so large, that either structures like function arguments, return values and message contents become truncated, or the messages end up queuing up because of the I/O bottleneck.

    The exact limit of this approach depends on the individual case, but usually, a rule of thumb is that you can trace one typical module, and collect up to a few thousand traces. This is not enough for many applications, e.g. if the traced behaviour is a flaky test – especially if it fails rarely, or if the impact of trace collection makes it irreproducible.

    Tracing with Erlang Doctor

    Erlang Doctor is yet another tool built on top of the Erlang tracer, but it has an important advantage – by storing the traces in an ETS table, it reduces the impact on the traced system (by eliminating costly I/O operations), while opening up the possibility of further processing and analysis of the collected traces.

    Erlang Doctor is yet another tool built on top of the Erlang tracer, but it has an important advantage – by storing the traces in an ETS table, it reduces the impact on the traced system (by eliminating costly I/O operations), while opening up the possibility of further processing and analysis of the collected traces.

    Being no longer limited by the amount of produced text, it scales up to millions of collected traces, and the first limit you might hit is the system memory. Usually it is possible to trace all modules in an application (or even a few applications) at once, unless it is under heavy load. Thanks to the clear separation between data acquisition and analysis, this approach can be called ad-hoc instrumentation rather than logging. The whole process has to be repeated only in rare situations, e.g. if wrong application was traced. Of course tracing production nodes is always risky, and not recommended, unless very strict limits are set up in Erlang Doctor.

    Getting Started

    Erlang Doctor is available at https://github.com/chrzaszcz/erlang_doctor . For Elixir, there is https://github.com/chrzaszcz/ex_doctor , which is a minimal wrapper around Erlang Doctor. Both tools have Hex packages ( erlang_doctor , ex_doctor ). You have a few options for installation and running, depending on your use case:

    1. If you want it in your Erlang/Elixir shell right now, use the “firefighting snippets” provided in the Hex or GitHub docs. Because Erlang Doctor is just one module (and ExDoctor is two), you can simply download, compile, load and start the tool with a one-liner.
    2. For development, it is best to have it always at hand by initialising it in your ~/.erlang or ~/.iex.exs files. This way it will be available in all your interactive shells, e.g. rebar3 shell or iex -S mix .
    3. For easy access in your release, you can include it as a dependency of your project.

    Basic usage

    The following examples are in Erlang, and you can run them yourself – just clone erlang_doctor , compile it, and execute rebar3 as test shell . Detailed examples for both Erlang and Elixir are provided in the Hex Docs ( erlang_doctor , ex_doctor ). The first step is to start the tool:

    1> tr:start().
    {ok,<0.86.0>}
    

    There is also tr:start/1 with additional options . For example, tr:start(#{limit => 10000}) would stop tracing, when there are 10 000 traces in the ETS table, which provides a safety valve against memory consumption.

    Trace collection

    Having started the Erlang Doctor, we can now trace selected modules – here we are using a test suite from Erlang Doctor itself:

    2> tr:trace([tr_SUITE]).
    ok
    

    The tr:trace/1 function accepts a list of modules or {Module, Function, Arity} tuples. Alternatively, you can provide a map of options to trace specific processes or to enable message tracing. You can also trace entire applications, e.g. tr:trace_app(your_app) or tr:trace_apps([app1, app2]) .

    Let’s trace the following function call. It calculates the factorial recursively, and sleeps for 1 ms before each step:

    3> tr_SUITE:sleepy_factorial(3).
    6
    

    It’s a good practice to stop tracing as soon as you don’t need it anymore:

    4> tr:stop_tracing().
    ok
    

    Trace analysis

    The collected traces are accumulated in an ETS table (default name: trace ). They are stored as tr records, and to display them, we need to load the record definitions:

    5> rr(tr).
    [node,tr]
    

    If you don’t have many traces, you can just list all of them:

    6> tr:select().
    [#tr{index = 1, pid = <0.175.0>, event = call, mfa = {tr_SUITE,sleepy_factorial,1},
         data = [3], ts = 1559134178217371, info = no_info},
     #tr{index = 2, pid = <0.175.0>, event = call, mfa = {tr_SUITE,sleepy_factorial,1},
         data = [2], ts = 1559134178219102, info = no_info},
     #tr{index = 3, pid = <0.175.0>, event = call, mfa = {tr_SUITE,sleepy_factorial,1},
         data = [1], ts = 1559134178221192, info = no_info},
     #tr{index = 4, pid = <0.175.0>, event = call, mfa = {tr_SUITE,sleepy_factorial,1},
         data = [0], ts = 1559134178223107, info = no_info},
     #tr{index = 5, pid = <0.175.0>, event = return, mfa = {tr_SUITE,sleepy_factorial,1},
         data = 1, ts = 1559134178225146, info = no_info},
     #tr{index = 6, pid = <0.175.0>, event = return, mfa = {tr_SUITE,sleepy_factorial,1},
         data = 1, ts = 1559134178225153, info = no_info},
     #tr{index = 7, pid = <0.175.0>, event = return, mfa = {tr_SUITE,sleepy_factorial,1},
         data = 2, ts = 1559134178225155, info = no_info},
     #tr{index = 8, pid = <0.175.0>, event = return, mfa = {tr_SUITE,sleepy_factorial,1},
         data = 6, ts = 1559134178225156, info = no_info}]


    The index field is auto-incremented, and data contains an argument list or a return value, while ts is a timestamp in microseconds. To select specific fields of matching records, use tr:select/1 , providing a selector function, which is passed to ets:fun2ms/1 .

    7> tr:select(fun(#tr{event = call, data = [N]}) -> N end).
    [3, 2, 1, 0]
    

    You can use tr:select/2 to further filter the results by searching for a specific term in data . In this simple example we search for the number 2 :

    8> tr:select(fun(T) -> T end, 2).
    [#tr{index = 2, pid = <0.395.0>, event = call, mfa = {tr_SUITE,sleepy_factorial,1},
         data = [2], ts = 1705475521744690, info = no_info},
     #tr{index = 7, pid = <0.395.0>, event = return, mfa = {tr_SUITE,sleepy_factorial,1},
         data = 2, ts = 1705475521750454, info = no_info}]
    

    This is powerful, as it searches all nested tuples, lists and maps, allowing you to search for arbitrary terms. For example, even if your code outputs something like “Unknown error”, you can pinpoint the originating function call. There is a similar function tr:filter/1 , which filters all traces with a predicate function (this time not limited by fun2ms ). In combination with tr:contains_data/2 , you can get the same result as above:

    9> Traces = tr:filter(fun(T) -> tr:contains_data(2, T) end).
    [#tr{index = 2, pid = <0.395.0>, event = call, mfa = {tr_SUITE,sleepy_factorial,1},
         data = [2], ts = 1705475521744690, info = no_info},
     #tr{index = 7, pid = <0.395.0>, event = return, mfa = {tr_SUITE,sleepy_factorial,1},
         data = 2, ts = 1705475521750454, info = no_info}]


    There is also tr:filter/2 , which can be used to search in a different table than the current one – or in a list. As an example, let’s get only function calls from Traces returned by the previous call:

    10> tr:filter(fun(#tr{event = call}) -> true end, Traces).
    [#tr{index = 2, pid = <0.395.0>, event = call, mfa = {tr_SUITE,sleepy_factorial,1},
         data = [2], ts = 1705475521744690, info = no_info}]

    To find the tracebacks (stack traces) for matching traces, use tr:tracebacks/1 :

    11> tr:tracebacks(fun(#tr{data = 1}) -> true end).
    [[#tr{index = 3, pid = <0.395.0>, event = call, mfa = {tr_SUITE,sleepy_factorial,1},
          data = [1], ts = 1705475521746470, info = no_info},
      #tr{index = 2, pid = <0.395.0>, event = call, mfa = {tr_SUITE,sleepy_factorial,1},
          data = [2], ts = 1705475521744690, info = no_info},
      #tr{index = 1, pid = <0.395.0>, event = call, mfa = {tr_SUITE,sleepy_factorial,1},
          data = [3], ts = 1705475521743239, info = no_info}]]

    Note, that by specifying data = 1 , we are only matching return traces, as call traces always have a list in data . Only one traceback is returned, starting with a call that returned 1. What follows is the stack trace for this call. There was a second matching traceback, but it wasn’t shown, because whenever two tracebacks overlap, the longer one is skipped. You can change this with tr:tracebacks/2 , providing #{output => all}) as the second argument. There are more options available, allowing you to specify the queried table/list, the output format, and the maximum amount of data returned. If you only need one traceback, you can call tr:traceback/1 or tr:traceback/2 . Additionally, it is possible to pass a tr record (or an index) directly to tr:traceback/1 .


    To get a list of traces between each matching call and the corresponding return, use tr:ranges/1 :

    12> tr:ranges(fun(#tr{data = [1]}) -> true end).
    [[#tr{index = 3, pid = <0.395.0>, event = call, mfa = {tr_SUITE,sleepy_factorial,1},
          data = [1], ts = 1705475521746470, info = no_info},
      #tr{index = 4, pid = <0.395.0>, event = call, mfa = {tr_SUITE,sleepy_factorial,1},
          data = [0], ts = 1705475521748499, info = no_info},
      #tr{index = 5, pid = <0.395.0>, event = return, mfa = {tr_SUITE,sleepy_factorial,1},
          data = 1, ts = 1705475521750451, info = no_info},
      #tr{index = 6, pid = <0.395.0>, event = return, mfa = {tr_SUITE,sleepy_factorial,1},
          data = 1, ts = 1705475521750453, info = no_info}]]

    There is also tr:ranges/2 with options , allowing to set the queried table/list, and to limit the depth of nested traces. In particular, you can use #{max_depth => 1} to get only the top-level call and the corresponding return. If you only need the first range, use tr:range/1 or tr:range/2 .

    Last but not least, you can get a particular trace record with tr:lookup/1 , and replay a particular function call with tr:do/1 :

    13> T = tr:lookup(1).
    #tr{index = 1, pid = <0.175.0>, event = call, mfa = {tr_SUITE,sleepy_factorial,1},
        data = [3], ts = 1559134178217371, info = no_info}
    14> tr:do(T).
    6
    

    This is useful e.g. for checking if a bug has been fixed without running the whole test suite, or to reproduce an issue while capturing further traces. This function can be called with an index as the argument: tr:do(1) .

    Quick profiling

    Although there are dedicated profiling tools for Erlang, such as fprof and eprof , you can use Erlang Doctor to get a hint about possible bottlenecks and redundancies in your system with function call statistics. One of the advantages is that you already have the traces collected from your system, so you don’t need to trace again. Furthermore, tracing only specific modules gives you much simpler output, that you can easily read and process in your Erlang shell.

    Call statistics

    To get statistics of function call times, you can use tr:call_stat/1 , providing a function that returns a key by which the traces will be aggregated. The simplest use case is to get the total number of calls and their time. To do this, we group all calls under one key, e.g. total :

    15> tr:call_stat(fun(_) -> total end).
    #{total => {4,7216,7216}}

    The tuple {4,7216,7216} means that there were four calls in total with an accumulated time of 7216 microseconds, and the “own” time was also 7216 μs – this is the case because we have aggregated all traced functions. To see different values, let’s group the stats by the function argument:

    16> tr:call_stat(fun(#tr{data = [N]}) -> N end).
    #{0 => {1,1952,1952}, 1 => {1,3983,2031}, 2 => {1,5764,1781}, 3 => {1,7216,1452}}

    Now it is apparent that although sleepy_factorial(3) took 7216 μs, only 1452 μs were spent in the function itself, and the remaining 5764 μs were spent in the nested calls. To filter out unwanted function calls, just add a guard:

    17> tr:call_stat(fun(#tr{data = [N]}) when N < 3 -> N end).
    #{0 => {1,1952,1952}, 1 => {1,3983,2031}, 2 => {1,5764,1781}}

    There are additional utilities: tr:sorted_call_stat/1 and tr:print_sorted_call_stat/2 , which gives you different output formats.

    Call tree statistics

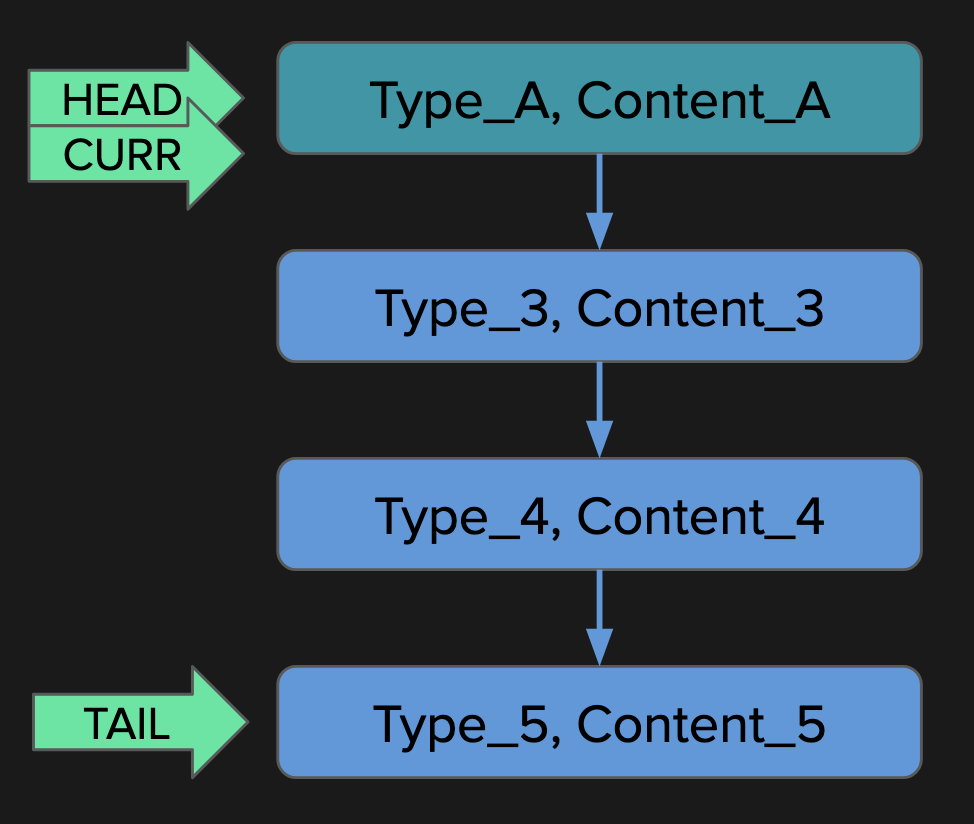
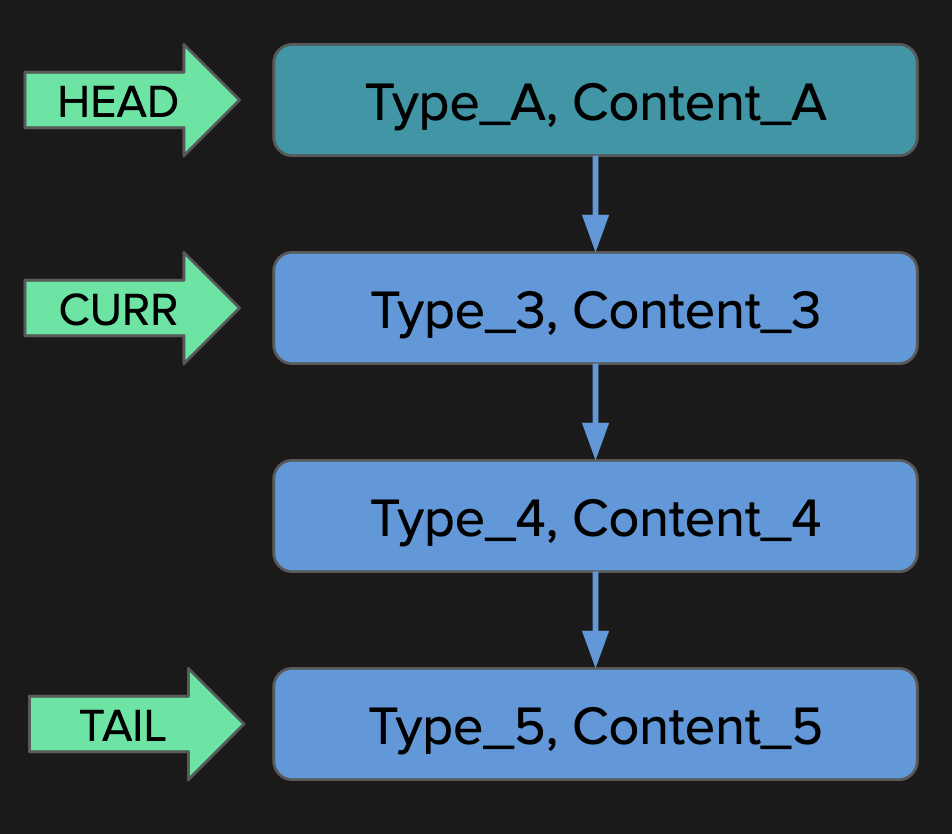
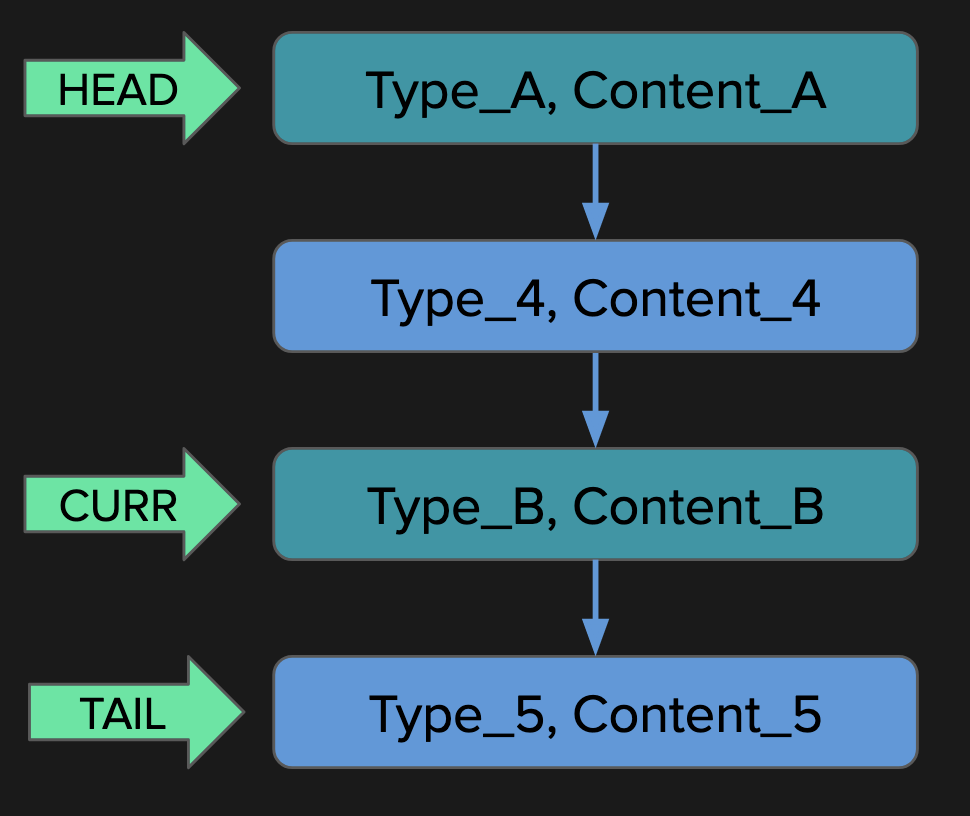
    If your code is performing the same operations very often, it might be possible to optimise it. To detect such redundancies, you can use tr:top_call_trees/0 , which detects complete call trees that repeat several times, where corresponding function calls and returns have the same arguments and return values, respectively. As an example, let’s trace a call to a function which calculates the 4th element of the Fibonacci sequence recursively. The trace table should be empty, so let’s clean it up first:

    18> tr:clean().
    ok
    19> tr:trace([tr_SUITE]).
    ok
    20> tr_SUITE:fib(4).
    3
    21> tr:stop_tracing().
    ok
    

    Now it is possible to print the most time-consuming call trees that repeat at least twice:

    22> tr:top_call_trees().
    [{13, 2, #node{module = tr_SUITE,function = fib, args = [2],
                   children = [#node{module = tr_SUITE, function = fib, args = [1],
                                     children = [], result = {return,1}},
                               #node{module = tr_SUITE, function = fib, args = [0],
                                     children = [], result = {return,0}}],
                   result = {return,1}}},
     {5, 3, #node{module = tr_SUITE,function = fib, args = [1],
                  children = [], result = {return,1}}}]

    The resulting list contains tuples {Time, Count, Tree} where Time is the accumulated time (in microseconds) spent in the Tree , and Count is the number of times the tree repeated. The list is sorted by Time , descending. In the example, fib(2) was called twice, which already shows that the recursive implementation is suboptimal. You can see the two repeating subtrees in the call tree diagram:

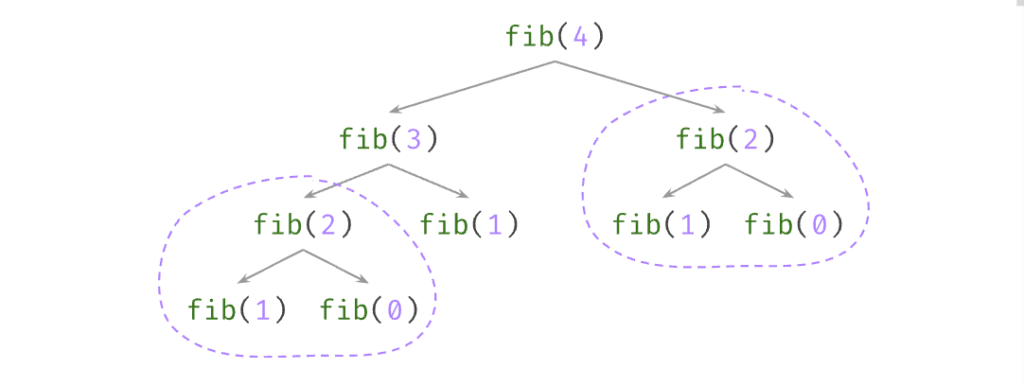
    The second listed tree consists only of fib(1) , and it was called three times. There is also tr:top_call_trees/1 with options , allowing customisation of the output format – you can set the minimum number of repetitions, maximum number of presented trees etc.

    ETS table manipulation

    To get the current table name, use tr:tab/0 :

    23> tr:tab().
    trace
    

    To switch to a new table, use tr:set_tab/1 . The table need not exist.

    24> tr:set_tab(tmp).
    ok
    

    Now you can collect traces to the new table without changing the original one. You can dump the current table to file with tr:dump/1 – let’s dump the tmp table:

    25> tr:dump("tmp.ets").
    ok
    

    In a new Erlang session, you can load the data with tr:load/1 . This will set the current table name to tmp . Finally, you can remove all traces from the ETS table with tr:clean/0 . To stop Erlang Doctor, just call tr:stop/0 .

    Summary

    Now you have an additional utility in your Erlang/Elixir toolbox, which you can try out whenever you need to debug an issue or learn about unknown or unexpected system behaviour. Just remember to be extremely cautious when using it in a production environment. If you have any feedback, please provide it on GitHub, and if you like the tool, consider giving it a star.

    The post Guess Less with Erlang Doctor appeared first on Erlang Solutions .

    • chevron_right

      Ignite Realtime Blog: Openfire inVerse plugin version 10.1.7.1 released!

      news.movim.eu / PlanetJabber · Friday, 15 March - 12:55

    We have made available a new version of the inVerse plugin for Openfire! This plugin allows you to easily deploy the third-party Converse client in Openfire. In this release, the version of the client that is bundled in the plugin is updated to 10.1.7.

    The updated plugin should become available for download in your Openfire admin console in the course of the next few hours. Alternatively, you can download the plugin directly, from the plugin’s archive page .

    For other release announcements and news follow us on Mastodon or X

    1 post - 1 participant

    Read full topic

    • chevron_right

      Erlang Solutions: gen_statem Unveiled

      news.movim.eu / PlanetJabber · Thursday, 14 March - 09:21 · 12 minutes

    gen_statem and protocols

    This blog post is a deep dive into some of the concepts discussed in my recent conference talk at FOSDEM . The presentation explored some basic theoretical concepts of Finite State Machines, and some special powers of Erlang’s gen_statem in the context of protocols and event-driven development, and building upon this insight, this post delves into harnessing the capabilities of the gen_statem behaviour. Let’s jump straight into it!

    Protocols

    The word protocol comes from the Greek “πρωτόκολλον”, from πρῶτος (prôtos, “first”) + κόλλα (kólla, “glue”), used in Byzantine greek as the first sheet of a papyrus-roll, bearing the official authentication and date of manufacture of the papyrus . Over time, the word describing the first page became a synecdoche for the entire document.

    The word protocol was then used primarily to refer to diplomatic or political treaties until the field of Information Technology overloaded the word to describe “treaties” too, but between machines, which as in diplomacy, governs the manner of communication between two entities . As the entities communicate, a given entity receives messages describing the interactions that peers are establishing with it, creating a model where an entity reacts to events .

    In this field of Technology, so much of the job of a programmer is implementing such communication protocol , which reacts to events . The protocol defines the valid messages and the valid order, and any side effects an event might have. You know many such protocols: TCP, TLS, HTTP, or XMPP, just to name some good old classics.

    The event queue

    As a BEAM programmer, implementing such an event-driven program is an archetypical paradigm you’re well familiar with: you have a process, which has a mailbox, and the process reacts to these messages one by one. It is the actor model in a nutshell: an actor can, in response to a message it receives:

    • send a finite number of messages to other Actors;
    • create a finite number of new Actors;
    • designate the behaviour to be used for the next message it receives.

    It is ubiquitous to implement such actors as a gen_server, but, pay attention to the last point: designate the behaviour to be used for the next message it receives . When a given event (a message) implies information about how the next event should be processed, there is implicitly a transformation of the process state. What you have is a State Machine in disguise.

    Finite State Machines

    Finite State Machines (FSM for short) are a function 𝛿 of an input state and an input event, to an output state where the function can be applied again. This is the idea of the actor receiving a message and designating the behaviour for the next: it chooses the state that will be input together with the next event.

    FSMs can also define output, in such cases they are called Finite State Transducers (FST for short, often simplified to FSMs too), and their definition adds another alphabet for output symbols, and the function 𝛿 that defines the machine does return the next state together with the next output symbol for the current input.

    gen_statem

    When the function’s input is the current state and an input symbol, and the output is a new state and a new output symbol, we have a Mealy machine . And when the output alphabet of one machine is the input alphabet of another, we can then intuitively compose them. This is the pattern that gen_statem implements.

    gen_statem has three important features that are easily overlooked, taking the best of pure Erlang programming and state machine modelling: it can simulate selective receives, offers an extended mailbox, and allows for complex data structures as the FSM state.

    Selective receives

    Imagine the archetypical example of an FSM, a light switch. The switch is for example digital and translates requests to a fancy light-set using an analogous cable protocol. The code you’ll need to implement will look something like the following:

    handle_call(on, _From, {off, Light}) ->
        on = request(on, Light),
        {reply, on, {on, Light}};
    handle_call(off, _From, {on, Light}) ->
        off = request(off, Light),
        {reply, off, {off, Light}};
    handle_call(on, _From, {on, Light}) ->
        {reply, on, {on, Light}};
    handle_call(off, _From, {off, Light}) ->
        {reply, off, {off, Light}}.

    But now imagine the light request was to be asynchronous, now your code would look like the following:

    handle_call(on, From, {off, undefined, Light}) ->
        Ref = request(on, Light),
        {noreply, {off, {on, Ref, From}, Light}};
    handle_call(off, From, {on, undefined, Light}) ->
        Ref = request(off, Light),
        {noreply, {on, {off, Ref, From}, Light}};
    
    handle_call(off, _From, {on, {off, _, _}, Light} = State) ->
        {reply, turning_off, State};  %% ???
    handle_call(on, _From, {off, {on, _, _}, Light} = State) ->
        {reply, turning_on, State}; %% ???
    handle_call(off, _From, {off, {on, _, _}, Light} = State) ->
        {reply, turning_on_wait, State};  %% ???
    handle_call(on, _From, {on, {off, _, _}, Light} = State) ->
        {reply, turning_off_wait, State}; %% ???
    
    handle_info(Ref, {State, {Request, Ref, From}, Light}) ->
        gen_server:reply(From, Request),
        {noreply, {Request, undefined, Light}}.

    The problem is, that now the order of events is not defined, and reorderings of the user requesting a switch and the light system announcing finalising the request are possible, so you need to handle these cases. When the switch and the light system had only two states each, you had to design and write four new cases: the number of new cases grows by multiplying the number of cases on each side. And each case is a computation of the previous cases, effectively creating a user-level callstack.

    So we now try migrating the code to a properly explicit state machine, as follows:

    off({call, From}, off, {undefined, Light}) ->
        {keep_state_and_data, [{reply, From, off}]};
    off({call, From}, on, {undefined, Light}) ->
        Ref = request(on, Light),
        {keep_state, {{Ref, From}, Light}, []};
    off({call, From}, _, _) ->
        {keep_state_and_data, [postpone]};
    off(info, {Ref, Response}, {{Ref, From}, Light}) ->
        {next_state, Response, {undefined, Light}, [{reply, From, Response}]}.
    
    on({call, From}, on, {undefined, Light}) ->
        {keep_state_and_data, [{reply, From, on}]};
    on({call, From}, off, {undefined, Light}) ->
        Ref = request(off, Light),
        {keep_state, {{Ref, From}, Light}, []};
    on({call, From}, _, _) ->
        {keep_state_and_data, [postpone]};
    on(info, {Ref, Response}, {{Ref, From}, Light}) ->
        {next_state, Response, {undefined, Light}, [{reply, From, Response}]}.

    Now the key lies in postponing requests: this is akin to Erlang’s selective receive clauses, where the mailbox is explored until a matching message is found. Events that arrive out of order can this way be treated when the order is right.

    This is an important difference between how we learn to program in pure Erlang, with the power of selective receives where we chose which message to handle, and how we learn to program in OTP, where generic behaviours like gen_server force us to handle the first message always, but in different clauses depending on the semantics of the message ( handle_cast, handle_call and handle_info ). With the power to postpone a message, we effectively choose which message to handle without being constrained with the code location.

    This section is inspired really by Ulf Wiger’s fantastic talk, Death by Accidental Complexity . So if you’ve known of the challenge he explained, this section hopefully serves as a solution to you.

    Complex Data Structures

    This was much explained in the previous blog on state machines , by using gen_statem’ s handle_event_function callback, apart from all the advantages explained in the aforementioned blog, we can also reduce the implementation of 𝛿 to a single function called handle_event , which makes the previous code take advantage of a lot of code reuse, see the following equivalent state machine:

    handle_event({call, From}, State, State, {undefined, Light}) ->
        {keep_state_and_data, [{reply, From, State}]};
    handle_event({call, From}, Request, State, {undefined, Light}) ->
        Ref = request(Request, Light),
        {keep_state, {{Ref, From}, Light}, []};
    handle_event({call, _}, _, _, _) ->
        {keep_state_and_data, [postpone]};
    handle_event(info, {Ref, Response}, State, {{Ref, From}, Light}) ->
        {next_state, Response, {undefined, Light}, [{reply, From, Response}]}.

    This section was extensively described in the previous blog post so to learn more about it, please enjoy your read!

    An extended mailbox

    We saw that the function 𝛿 of the FSM in question is called when a new event is triggered. In implementing a protocol, this is modelled by messages to the actor’s mailbox. In a pure FSM, a message that has no meaning within a state would crash the process, but in practice, while the order of messages is not defined, it might be a valid computation to postpone them and process them when we reach the right state.

    This is what a selective receive would do, by exploring the mailbox and looking for the right message to handle for the current state. In OTP, the general practice is to leave the lower-level communication abstractions to the underlying language features, and code in a higher and more sequential style as defined by the generic behaviours: in gen_statem , we have an extended view of the FSM’s event queue.

    There are two more things to notice we can do with gen_statem actions: one is to insert ad-hoc events with the construct {next_event, EventType, EventContent} , and the other is to insert timeouts, which can be restarted automatically on any new event, any state change, or not at all. These seem like different event queues for our eventful state machine, together with the process’s mailbox, but really it is only one queue we can see as an extended mailbox.

    The mental picture is as follows: There is only one event queue, which is an extension of the process mailbox, and this queue has got three pointers:

    • A head pointing at the oldest event;
    • A current pointing at the next event to be processed.
    • A tail pointing at the youngest event;

    This model is meant to be practically identical to how the process mailbox is perceived .

    • postpone causes the current position to move to its next younger event, so the previous current position is still in the queue reachable from head .
    • Not postponing an event i.e consuming it causes the event to be removed from the queue and current position to move to its next younger event.
    • NewState =/= State causes the current position to be set to head i.e the oldest event.
    • next_event inserts event(s) at the current position i.e as just older than the previous current position.
    • {timeout, 0, Msg} inserts a timeout, Msg event after tail i.e as the new youngest received event.

    Let’s see the event queue in pictures:


    handle_event(Type1, Content1, State1, Data) ->
    {keep_state_and_data, [postpone]};
    8oICre6HDbYA50WEcP3-s4U1tuBjBsW6QBAxBE-904WT2LLLCvSNOd0q9W88CrqM0AA6BUSWPSOc3TL1d-kNs8A8XLinFPUVJ9-fQkZ4NFzKlhsvZ7kO1P13H-gzssYP5q4TAGSF-2osVeJzgPYx6hw When the first event to process is 1 , after any necessary logic we might decide to postpone it. In such case, the event remains in the queue, reachable from HEAD , but Current is moved to the next event in the queue, event 2 .

    handle_event(Type1, Content1, State1, Data) ->
    {keep_state_and_data, [postpone]};
    ...
    handle_event(Type2, Content2, State1, Data) ->
    {next_state, State2};
    LBtgKzLRtZCXo5R6NBtPU_GI8_cIfj53ZnVKKrWmQC0hgk8avy9xGKavA6WEyy7uhC4KPks5bzUem_k6ZzN3i670VncbEK8a3Duhy-mwvgX9TYYv_NLjCdMs-I5sMdWegYT8ILSTK7qPZxuiMpB_EOo When handling event 2 , after any necessary logic, we decide to transition to a new state. In this case, 2 is removed from the queue, as it has been processed, and Current is moved to HEAD , which points again to 1 , as the state is now a new one.

    handle_event(Type1, Content1, State1, Data) ->
    {keep_state_and_data, [postpone]};
    ...
    handle_event(Type2, Content2, State1, Data) ->
    {next_state, State2};
    ...
    handle_event(Type1, Content1, State2, Data) ->
    {keep_state_and_data, [{next_event, TypeA, ContentA}]};
    XJGw9UZku0Mx90WHeck-QpmvRyYlxNM_Am-7FkqWZfvCuqIJX9lfhDIx1MLjGOau9U_sTCY_8OHZOBY0pWbNTFX-C5OC5rjklyFzdfqIjSU5G7MopYCb6sCIS11WlitZjBLBPj4eFrGnJ63IG-wUWyo After any necessary handling for 1 , we now decide to insert a next_event called A . Then 1 is dropped from the queue, and A is inserted at the point where Current was pointing. HEAD is also updated to the next event after 1 , which in this case is now A .
    handle_event(Type1, Content1, State1, Data) ->
    {keep_state_and_data, [postpone]};
    ...
    handle_event(Type2, Content2, State1, Data) ->
    {next_state, State2};
    ...
    handle_event(Type1, Content1, State2, Data) ->
    {keep_state_and_data, [{next_event, TypeA, ContentA}]};
    ...
    handle_event(TypeA, ContentA, State2, Data) ->
    {keep_state_and_data, [postpone]};

    vebJ5EXY48AZQvGsM2f5pB3BoLe8Meq7NknpqdeICiMhMHuzzpqX5saAMsyw2oBe5Akh0oUvHDQ-cSnp-YEtAuTCmNrwu8Gkx5iY1rPUctQ5d2cYXAyRJk7J-pKfzrugO5e0pkJ-2VQdxbPgZZ-PdlU Now we decide to postpone A , so Current is moved to the next event in the queue, 3 .

    handle_event(Type1, Content1, State1, Data) ->
    {keep_state_and_data, [postpone]};
    ...
    handle_event(Type2, Content2, State1, Data) ->
    {next_state, State2};
    ...
    handle_event(Type1, Content1, State2, Data) ->
    {keep_state_and_data, [{next_event, TypeA, ContentA}]};
    ...
    handle_event(TypeA, ContentA, State2, Data) ->
    {keep_state_and_data, [postpone]};
    ...
    handle_event(Type3, Content3, State2, Data) ->
    keep_state_and_data;
    Or2R4Obr12CTlQSK1chBu5nNneEA7yNjTzC_g2N4PqXfAJJPRq_rqwbor-jYwcuxbFHOH32fHAVAjXydFavQAOIwehPqXX2PljD_qLhgxN9W8IcStNsQS38k05IVp6IOe7FtVGdkLJKbraebbzRhSZA 3 is processed normally, and then dropped from the queue. No other event is inserted nor postponed, so Current is simply moved to the next, 4 .


    handle_event(Type1, Content1, State1, Data) ->
    {keep_state_and_data, [postpone]};
    ...
    handle_event(Type2, Content2, State1, Data) ->
    {next_state, State2};
    ...
    handle_event(Type1, Content1, State2, Data) ->
    {keep_state_and_data, [{next_event, TypeA, ContentA}]};
    ...
    handle_event(TypeA, ContentA, State2, Data) ->
    {keep_state_and_data, [postpone]};
    ...
    handle_event(Type3, Content3, State2, Data) ->
    keep_state_and_data;
    ...
    handle_event(Type4, Content4, State2, Data) ->
    {keep_state_and_data,
    [postpone, {next_event, TypeB, ContentB}]};
    Q2WfdHZUnxTZHo7WcSNT8x1z2SZkpwoFVyOgN-Fip5BzwV38pr3-RCYziIJC8vSyz8_btJP8Uv-Wifil6sOOiLY3SjKOhiZS0jS0nIsz--qOyOSSEraqUY0d0LuEXrwCB13989Z-EYd9DYyMJDAWdgU And 4 is now postponed, and a new event B is inserted, so while HEAD still remains pointing at A , 4 is kept in the queue and Current will now point to the newly inserted event B .

    This section is in turn inspired by this comment on GitHub.

    Conclusions

    We’ve seen how protocols are governances over the manners of communication between two entities and that these governances define how messages are transmitted, and processed, and how they relate to each other. We’ve seen how the third clause of the actor model dictates that an actor can designate the behaviour to be used for the next message it receives and how this essentially defines the 𝛿 function of a state machine and that Erlang’s gen_statem behaviour is an FSM engine with a lot of power over the event queue and the state data structures.

    Do you have protocol implementations that have suffered from extensibility problems? Have you had to handle an exploding number of cases to implement when the event order might reorder in any possible way? If you’ve suffered from death by accidental complexity, or your code has suffered from state machines in disguise, or your testing isn’t comprehensive enough by default, the tricks and points of view of this post should help you get started, and we can always help you keep moving forward!

    The post gen_statem Unveiled appeared first on Erlang Solutions .

    • chevron_right

      JMP: Newsletter: eSIM Adapter (and Google Play Fun)

      news.movim.eu / PlanetJabber · Tuesday, 12 March - 20:31 · 4 minutes

    Hi everyone!

    Welcome to the latest edition of your pseudo-monthly JMP update!

    In case it’s been a while since you checked out JMP, here’s a refresher: JMP lets you send and receive text and picture messages (and calls) through a real phone number right from your computer, tablet, phone, or anything else that has a Jabber client.  Among other things, JMP has these features: Your phone number on every device; Multiple phone numbers, one app; Free as in Freedom; Share one number with multiple people.

    eSIM Adapter

    This month we’re pleased to announce the existence of the JMP eSIM Adapter. This is a device that acts exactly like a SIM card and will work in any device that accepts a SIM card (phone, tablet, hotspot, Rocket Stick), but the credentials it offers come from eSIMs provided by the user. With the adapter, you can use eSIMs from any provider in any device, regardless of whether the device or OS support eSIM. It also means you can move all your eSIMs between devices easily and conveniently. It’s the best of both worlds: the convenience of downloading eSIMs along with the flexibility of moving them between devices and using them on any device.

    So how are eSIMs downloaded and written to the device in order to use them? The easiest and most convenient way will be the official Android app, which will of course be freedomware and available in F-droid soon. The app is developed by PeterCxy of OpenEUICC fame. If you have an OS that bundles OpenEUICC, it will also work for writing eSIMs to the adapter. The app is not required to use the adapter, and swapping the adapter into another device will work fine. What if you want to switch eSIMs without putting the card back into an Android device? No problem; as long as your other device supports the standard SIM Toolkit menus, you will be able to switch eSIMs on the fly.

    What if you don’t have an Android device at all? No problem, there are a few other options for writing eSIMs to the adapter. You can get a PC/SC reader device (about $20 on Amazon for example) and then use a tool such as lpac to download and write eSIMs to the adapter from your PC. Some other cell modems may also be supported by lpac directly. Finally, there is work in progress on an optional tool that will be able to use a server (optionally self-hosted) to facilitate downloading eSIMs with just the SIM Toolkit menus.

    There is a very limited supply of these devices available for testing now, so if you’re interested, or just have questions, swing by the chatroom (below) and let us know. We expect full retail roll-out to happen in Q2.

    Cheogram Android

    Cheogram Android saw a major new release this month, 2.13.4-1 includes a visual refresh, many fixes, and some features including:

    • Allow locally muting channel participants
    • Allow setting subject on messages and threads
    • Display list of recent threads in channel details
    • Support full channel configuration form for owners
    • Register with channel when joining, deregister when leaving (where supported)
    • Expert setting to choose voice message codec

    Is My Contact List Uploaded?

    Cheogram Android has always included optional features for integrating with your local Android contacts (if you give permission). If you add a Jabber ID to an Android contact, their name and image are displayed in the app. Additionally, if you use a PSTN gateway (such as cheogram.com, which JMP acts as a plugin for) all your contacts with phone numbers are displayed in the app, making it easy to message or call them via the gateway. This is all done locally and no information is uploaded anywhere as part of this feature.

    Unfortunately, Google does not believe us. From speaking with developers of similar apps, it seems Google no longer believe anyone who has access to the device contacts is not uploading them somewhere. So, starting with this release, Cheogram Android from the Play Store says when asking for contact permission that contacts are uploaded. Not because they are, but because Google requires that we say so. The app’s privacy policy also says contacts are uploaded; again, only because Google requires that it say this without regard for whether it is true.

    Can any of your contacts be exposed to your server? Of course. If you choose to send a message or make a call, part of the message or call’s metadata will transit your server, so the server could become aware of that one contact. Similarly, if you view the contact’s details, the server may be asked whether it knows anything about this contact. And finally, if you tap the “Add Contact” button in the app to save this contact to your server-side list, that one contact is saved server-side. Unfortunately, spelling out all these different cases did not appease Google, who insisted we must say that we “upload the contact list to the server” in exactly those words. So, those words now appear.

    Thanks for Reading

    The team is growing! This month we welcome SavagePeanut to the team to help out with development.

    To learn what’s happening with JMP between newsletters, here are some ways you can find out:

    Thanks for reading and have a wonderful rest of your week!

    • wifi_tethering open_in_new

      This post is public

      blog.jmp.chat /b/march-newsletter-2024

    • chevron_right

      ProcessOne: Matrix gateway setup with ejabberd

      news.movim.eu / PlanetJabber · Monday, 11 March - 09:48 · 4 minutes

    As of version 24.02 , ejabberd is shipped with a Matrix gateway and can participate in the Matrix
    federation
    . This means that an XMPP client can exchange messages with Matrix users or rooms.

    Let’s see how to configure your ejabberd to enable this gateway.

    Configuration in ejabberd

    HTTPS listener

    First, add an HTTP handler , as Matrix uses HTTPS for Server-Server API.

    In the listen section of your ejabberd.yml configuration file, add a handler on Matrix port 8448 for path /_matrix that calls the mod_matrix_gw module. You must enable TLS on this port to accept HTTPS connections (unless a proxy already handles HTTPS in front of ejabberd) and provide a valid certificate for your Matrix domain (see matrix_domain below). You can set this certificate using the certfile option of the listener, like in the example below, or listing it in the certfiles top level option .

    Example :

    listen:
      -
        port: 5222
        module: ejabberd_c2s
      -
        port: 8448 # Matrix federation
        module: ejabberd_http
        tls: true
        certfile: "/opt/ejabberd/conf/matrix.pem"
        request_handlers:
          "/_matrix": mod_matrix_gw
    

    If you want to use a non-standard port instead of 8448 , you must serve a /.well-known/matrix/server on your Matrix domain (see below).

    Server-to-Server

    You must enable s2s (Server-to-Server federation) by setting an access rule all or allow on s2s_access top level option:

    Example :

    s2s_access: s2s
    
    access_rules:
      local:
        - allow: local
      c2s:
        - deny: blocked
        - allow
      s2s:
        - allow # to allow Matrix federation
    

    Matrix gateway module

    Finally, add mod_matrix_gw module in the modules list.

    Example :

    modules:
      mod_matrix_gw:
        matrix_domain: "matrixdomain.com"
        key_name: "key1"
        key: "SU4mu/j8b8A1i1EdyxIcKlFlrp+eSRBIlZwGyHP7Mfo="
    

    matrix_domain

    Replace matrixdomain.com with your Matrix domain. That domain must resolve to your ejabberd server or serve a file https://matrixdomain.com/.well-known/matrix/server that contains a JSON file with the address and Matrix port (as defined by the Matrix HTTPS handler, see above) of your ejabberd server:

    Example :

    {
       "m.server": "ejabberddomain.com:8448"
    }
    

    key_name & key

    The key_name is arbitrary. The key value is your base64-encoded ed25519 Matrix signing key . It can be generated by Matrix tools or in an Erlang shell using the command base64:encode(element(2, crypto:generate_key(eddsa, ed25519))). :

    Example :

    $ erl
    Erlang/OTP 24 [erts-12.3.1] [source] [64-bit] [smp:8:8] [ds:8:8:10] [async-threads:1] [dtrace]
    
    Eshell V12.3.1 (abort with ^G)
    1> base64:encode(element(2, crypto:generate_key(eddsa, ed25519))).
    <<"SU4mu/j8b8A1i1EdyxIcKlFlrp+eSRBIlZwGyHP7Mfo=">>
    2> q().
    ok
    

    Once your configuration is ready, you can restart ejabberd.

    Testing

    To check if your setup is correct, go to the following page and enter your Matrix domain (as set by the matrix_domain option):
    https://federationtester.matrix.org/

    This page should list any problem related to Matrix on your ejabberd installation.

    Routing

    What messages are routed to an external Matrix server?

    Implicit routing

    Let’s say an XMPP client connected to your ejabberd server sends a message to a JID user1@domain1.com . If domain1.com is defined by the hosts parameter of your ejabberd server (i.e. it’s one of your XMPP domains), the message will be routed locally. If it’s not, ejabberd will try to establish an XMPP Server-to-Server connection to a remote domain1.com XMPP server. If this fails (i.e. there is no such external domain1.com XMPP domain), then ejabberd will try on the Matrix federation, transforming the user1@domain1.com JID into the Matrix ID @user1:domain1.com and will try to open a connection to a remote domain1.com Matrix domain.

    Explicit routing

    It is also possible to route messages explicitly to the Matrix federation by setting the option matrix_id_as_jid in the mod_matrix_gw module to true :

    Example :

    modules:
      mod_matrix_gw:
        host: "matrix.@HOST@"
        matrix_domain: "matrixdomain.com"
        key_name: "key1"
        key: "SU4mu/j8b8A1i1EdyxIcKlFlrp+eSRBIlZwGyHP7Mfo="
        matrix_id_as_jid: true
    

    In this case, the automatic fallback to Matrix when XMPP s2s fails is disabled and messages must be explicitly sent to the matrix gateway service Jabber ID to be routed to a remote Matrix server.

    To send a message to the Matrix user @user:remotedomain.com , the XMPP client must send a message to the JID user%remotedomain.com@matrix.xmppdomain.com , where matrix.xmppdomain.com is the JID of the gateway service as set by the host option of the mod_matrix_gw module (the keyword @HOST@ is replaced with the XMPP domain of the server). If host is not set, the Matrix gateway JID is your XMPP domain with the matrix. prefix added.

    The default value for matrix_id_as_jid is false , so the implicit routing will be used if this option is not set.

    The post Matrix gateway setup with ejabberd first appeared on ProcessOne .
    • wifi_tethering open_in_new

      This post is public

      www.process-one.net /blog/matrix-gateway-setup-with-ejabberd/

    • chevron_right

      Ignite Realtime Blog: Openfire 4.8.1 Release

      news.movim.eu / PlanetJabber · Monday, 4 March - 15:57 · 1 minute

    The Ignite Realtime Community is pleased to announce the release of Openfire 4.8.1. This release addresses a number of issues found with the major 4.8.0 release a few months back.

    Interested in getting started? You can download installers of Openfire here . Our documentation contains an upgrade guide that helps you update from an older version.

    sha256sum checksum values for the release artefacts are as follows

    2ff28c5d7ff97305b2d6572e60b02f3708e86750d959459d7c5d6e17d4f9f932  openfire-4.8.1-1.noarch.rpm
    f622719e4dbd43aadc9434ba4ebc0d8c65ec30dd25a7d2e99c7de33006a24f56  openfire_4.8.1_all.deb
    3507b5d64c961daf526a52a73baaac7c84af12eb0115b961c2f95039255aec57  openfire_4_8_1.dmg
    141f6eaf374dfb7c4cca345e1b598fed5ce3af9c70062a8cc0d9571e15c29c7d  openfire_4_8_1.exe
    c6f0cf25a2d10acd6c02239ad59ab5954da5a4b541bc19949bd381fefb856da1  openfire_4_8_1.tar.gz
    bec5b03ed56146fec2f84593c7e7b269ee5c32b3a0d5f9e175bd41f28a853abe  openfire_4_8_1_x64.exe
    7403113b701aaf8a37dcd2d7e22fbb133161d322ad74505c95e54eaf6533f183  openfire_4_8_1.zip
    

    For other release announcements and news follow us on Mastodon or X

    1 post - 1 participant

    Read full topic

    • chevron_right

      Isode: Cobalt 1.5 – New Capabilities

      news.movim.eu / PlanetJabber · Thursday, 29 February - 13:18 · 1 minute

    Overview

    This release adds new functionality and features to Cobalt, our web based role and user provisioning tool. You can find out more about Cobalt here .

    Multiple Cobalt Servers

    This enhancement enables multiple Cobalt servers to be run against a single directory. There are two reasons for this.

    1. In a distributed environment it is useful to have multiple Cobalt servers at different locations, each connected to the local node of a multi-master directory.
    2. Where a read only directory is replicated, for example using Sodium Sync to a Mobile Unit, it is useful to run Cobalt (read only) against the replica, to allow local administrators to conveniently view the configuration using Cobalt.

    Password Management and Password Policy

    This update includes a number of enhancements relating to password management:

    1. Cobalt is now aware of password policy. A key change is that after administrator creation or change of password, when password policy requires user change, Cobalt will mark the password as requiring user change. To be useful in deployment, the applications used also need to be password policy aware.
    2. Cobalt added a user UI to enable password change/reset, to complement Administrator password change.
    3. Administrator option to email new password to user.

    Security Management

    1. Directory Access Rights Management. M-Vault Directory Groups enable specification of user rights, to directory and messaging configuration in the directory. This can be configured by Cobalt by domain administrators.
    2. Certificate expiry checking. When managing a directory holding many certificates, it is important to keep them up to date. Cobalt provides a tool which can be run at intervals to determine certificates which have expired and certificates which will expire soon.

    User Directory Viewer

    Cobalt’s primary purpose is directory administration. This update adds a complementary tool which enables users to access information in the directory managed by Cobalt. This uses anonymous access for user convenience.

    Miscellaneous

    1. Flexible Search. Cobalt administrators have the option to configure search fields available for users. Configuration is per-domain.
    2. Users, Roles and mailing list members now sorted alphabetically.
    3. Base DN can be specified for users for a domain. If specified, Cobalt allows browsing users under this DIT (entry) using subtree search. Add user operation is disabled if this is specified. This allows Cobalt to:
      1. Utilize User provision by other means, for reference from within Cobalt managed components.
      2. To modify the entries, but does not allow addition of new entries.
    • wifi_tethering open_in_new

      This post is public

      www.isode.com /company/wordpress/cobalt-1-5-new-capabilities/

    • chevron_right

      ProcessOne: ejabberd 24.02

      news.movim.eu / PlanetJabber · Wednesday, 28 February - 19:01 · 20 minutes

    🚀 Introducing ejabberd 24.02: A Huge Release!

    ejabberd 24.02 has just been release and well, this is a huge release with 200 commits and more in the libraries. We’ve packed this update with a plethora of new features, significant improvements, and essential bug fixes, all designed to supercharge your messaging infrastructure.


    🌐 Matrix Federation Unleashed: Imagine seamlessly connecting with Matrix servers – it’s now possible! ejabberd breaks new ground in cross-platform communication, fostering a more interconnected messaging universe. We have still some ground to cover and for that we are waiting for your feedback.
    🔐 Cutting-Edge Security with TLS 1.3 & SASL2 : In an era where security is paramount, ejabberd steps up its game. With support for TLS 1.3 and advanced SASL2 protocols, we increase the overall security for all platform users.
    🚀 Performance Enhancements with Bind 2: Faster connection times, especially crucial for mobile network users, thanks to Bind 2 and other performance optimizations.
    🔄 User gains better control over on their messages: The new support for XEP-0424 : Message Retraction allows users to manage their message history and remove something they posted by mistake.
    🔧 Optimized server pings by relying on an existing mechanism coming from XEP-0198
    📈 Streamlined API Versioning: Our refined API versioning means smoother, more flexible integration for your applications.
    🧩 Enhanced Elixir, Mix and Rebar3 Support

    If you upgrade ejabberd from a previous release, please review those changes:

    A more detailed explanation of those topics and other features:

    Matrix federation

    ejabberd is now able to federate with Matrix servers. Detailed instructions to setup Matrix federation with ejabberd will be detailed in another post.

    Here is a quick summary of the configuration steps:

    First, s2s must be enabled on ejabberd. Then define a listener that uses mod_matrix_gw :

    listen:
      -
        port: 8448
        module: ejabberd_http
        tls: true
        certfile: "/opt/ejabberd/conf/server.pem"
        request_handlers:
          "/_matrix": mod_matrix_gw
    

    And add mod_matrix_gw in your modules:

    modules:
      mod_matrix_gw:
        matrix_domain: "domain.com"
        key_name: "somename"
        key: "yourkeyinbase64"
    

    Support TLS 1.3, Bind 2, SASL2

    Support for XEP-0424 Message Retraction

    With the new support for XEP-0424: Message Retraction , users of MAM message archiving can control their message archiving, with the ability to ask for deletion.

    Support for XEP-0198 pings

    If stream management is enabled, let mod_ping trigger XEP-0198 <r/>equests rather than sending XEP-0199 pings. This avoids the overhead of the ping IQ stanzas, which, if stream management is enabled, are accompanied by XEP-0198 elements anyway.

    Update the SQL schema

    The table archive has a text column named origin_id (see commit 975681 ). You have two methods to update the SQL schema of your existing database:

    If using MySQL or PosgreSQL, you can enable the option update_sql_schema and ejabberd will take care to update the SQL schema when needed: add in your ejabberd configuration file the line update_sql_schema: true

    If you are using other database, or prefer to update manually the SQL schema:

    • MySQL default schema:
    ALTER TABLE archive ADD COLUMN origin_id text NOT NULL DEFAULT '';
    ALTER TABLE archive ALTER COLUMN origin_id DROP DEFAULT;
    CREATE INDEX i_archive_username_origin_id USING BTREE ON archive(username(191), origin_id(191));
    
    • MySQL new schema:
    ALTER TABLE archive ADD COLUMN origin_id text NOT NULL DEFAULT '';
    ALTER TABLE archive ALTER COLUMN origin_id DROP DEFAULT;
    CREATE INDEX i_archive_sh_username_origin_id USING BTREE ON archive(server_host(191), username(191), origin_id(191))
    
    • PostgreSQL default schema:
    ALTER TABLE archive ADD COLUMN origin_id text NOT NULL DEFAULT '';
    ALTER TABLE archive ALTER COLUMN origin_id DROP DEFAULT;
    CREATE INDEX i_archive_username_origin_id ON archive USING btree (username, origin_id);
    
    • PostgreSQL new schema:
    ALTER TABLE archive ADD COLUMN origin_id text NOT NULL DEFAULT '';
    ALTER TABLE archive ALTER COLUMN origin_id DROP DEFAULT;
    CREATE INDEX i_archive_sh_username_origin_id ON archive USING btree (server_host, username, origin_id);
    
    • MSSQL default schema:
    ALTER TABLE [dbo].[archive] ADD [origin_id] VARCHAR (250) NOT NULL;
    CREATE INDEX [archive_username_origin_id] ON [archive] (username, origin_id)
    WITH (PAD_INDEX = OFF, STATISTICS_NORECOMPUTE = OFF, ALLOW_ROW_LOCKS = ON, ALLOW_PAGE_LOCKS = ON);
    
    • MSSQL new schema:
    ALTER TABLE [dbo].[archive] ADD [origin_id] VARCHAR (250) NOT NULL;
    CREATE INDEX [archive_sh_username_origin_id] ON [archive] (server_host, username, origin_id)
    WITH (PAD_INDEX = OFF, STATISTICS_NORECOMPUTE = OFF, ALLOW_ROW_LOCKS = ON, ALLOW_PAGE_LOCKS = ON);
    
    • SQLite default schema:
    ALTER TABLE archive ADD COLUMN origin_id text NOT NULL DEFAULT '';
    CREATE INDEX i_archive_username_origin_id ON archive (username, origin_id);
    
    • SQLite new schema:
    ALTER TABLE archive ADD COLUMN origin_id text NOT NULL DEFAULT '';
    CREATE INDEX i_archive_sh_username_origin_id ON archive (server_host, username, origin_id);
    

    Authentication workaround for Converse.js and Strophe.js

    This ejabberd release includes support for XEP-0474: SASL SCRAM Downgrade Protection , and some clients may not support it correctly yet.

    If you are using Converse.js 10.1.6 or older, Movim 0.23 Kojima or older, or any other client based in Strophe.js v1.6.2 or older, you may notice that they cannot authenticate correctly to ejabberd.

    To solve that problem, either update to newer versions of those programs (if they exist), or you can enable temporarily the option disable_sasl_scram_downgrade_protection in the ejabberd configuration file ejabberd.yml like this:

    disable_sasl_scram_downgrade_protection: true
    

    Support for API versioning

    Until now, when a new ejabberd release changed some API command (an argument renamed, a result in a different format…), then you had to update your API client to the new API at the same time that you updated ejabberd.

    Now the ejabberd API commands can have different versions, by default the most recent one is used, and the API client can specify the API version it supports.

    In fact, this feature was implemented seven years ago , included in ejabberd 16.04 , documented in ejabberd Docs: API Versioning … but it was never actually used!

    This ejabberd release includes many fixes to get API versioning up to date, and it starts being used by several commands.

    Let’s say that ejabberd 23.10 implemented API version 0, and this ejabberd 24.02 adds API version 1. You may want to update your API client to use the new API version 1… or you can continue using API version 0 and delay API update a few weeks or months.

    To continue using API version 0:
    – if using ejabberdctl, use the switch --version 0 . For example: ejabberdctl --version 0 get_roster admin localhost
    – if using mod_http_api, in ejabberd configuration file add v0 to the request_handlers path. For example: /api/v0: mod_http_api

    Check the details in ejabberd Docs: API Versioning .

    ejabberd commands API version 1

    When you want to update your API client to support ejabberd API version 1, those are the changes to take into account:
    – Commands with list arguments
    – mod_http_api does not name integer and string results
    – ejabberdctl with list arguments
    – ejabberdctl list results

    All those changes are described in the next sections.

    Commands with list arguments

    Several commands now use list argument instead of a string with separators (different commands used different separators: ; : \\n , ).

    The commands improved in API version 1:
    add_rosteritem
    oauth_issue_token
    send_direct_invitation
    srg_create
    subscribe_room
    subscribe_room_many

    For example, srg_create in API version 0 took as arguments:

    {"group": "group3",
     "host": "myserver.com",
     "label": "Group3",
     "description": "Third group",
     "display": "group1\\ngroup2"}
    

    now in API version 1 the command expects as arguments:

    {"group": "group3",
     "host": "myserver.com",
     "label": "Group3",
     "description": "Third group",
     "display": ["group1", "group2"]}
    

    mod_http_api not named results

    There was an incoherence in mod_http_api results when they were integer/string and when they were list/tuple/rescode…: the result contained the name, for example:

    $ curl -k -X POST -H "Content-type: application/json" -d '{}' "http://localhost:5280/api/get_loglevel/v0"
    {"levelatom":"info"}
    

    Staring in API version 1, when result is an integer or a string, it will not contain the result name. This is now coherent with the other result formats (list, tuple, …) which don’t contain the result name either.

    Some examples with API version 0 and API version 1:

    $ curl -k -X POST -H "Content-type: application/json" -d '{}' "http://localhost:5280/api/get_loglevel/v0"
    {"levelatom":"info"}
    
    $ curl -k -X POST -H "Content-type: application/json" -d '{}' "http://localhost:5280/api/get_loglevel"
    "info"
    
    $ curl -k -X POST -H "Content-type: application/json" -d '{"name": "registeredusers"}' "http://localhost:5280/api/stats/v0"
    {"stat":2}
    
    $ curl -k -X POST -H "Content-type: application/json" -d '{"name": "registeredusers"}' "http://localhost:5280/api/stats"
    2
    
    $ curl -k -X POST -H "Content-type: application/json" -d '{"host": "localhost"}' "http://localhost:5280/api/registered_users/v0"
    ["admin","user1"]
    
    $ curl -k -X POST -H "Content-type: application/json" -d '{"host": "localhost"}' "http://localhost:5280/api/registered_users"
    ["admin","user1"]
    

    ejabberdctl with list arguments

    ejabberdctl now supports list and tuple arguments, like mod_http_api and ejabberd_xmlrpc. This allows ejabberdctl to execute all the existing commands, even some that were impossible until now like create_room_with_opts and set_vcard2_multi .

    List elements are separated with , and tuple elements are separated with : .

    Relevant commands:
    add_rosteritem
    create_room_with_opts
    oauth_issue_token
    send_direct_invitation
    set_vcard2_multi
    srg_create
    subscribe_room
    subscribe_room_many

    Some example uses:

    ejabberdctl add_rosteritem user1 localhost testuser7 localhost NickUser77l gr1,gr2,gr3 both
    ejabberdctl create_room_with_opts room1 conference.localhost localhost public:false,persistent:true
    ejabberdctl subscribe_room_many user1@localhost:User1,admin@localhost:Admin room1@conference.localhost urn:xmpp:mucsub:nodes:messages,u
    

    ejabberdctl list results

    Until now, ejabberdctl returned list elements separated with ; . Now in API version 1 list elements are separated with , .

    For example, in ejabberd 23.10:

    $ ejabberdctl get_roster admin localhost
    jan@localhost jan   none    subscribe       group1;group2
    tom@localhost tom   none    subscribe       group3
    

    Since this ejabberd release, using API version 1:

    $ ejabberdctl get_roster admin localhost
    jan@localhost jan   none    subscribe       group1,group2
    tom@localhost tom   none    subscribe       group3
    

    it is still possible to get the results in the old syntax, using API version 0:

    $ ejabberdctl --version 0 get_roster admin localhost
    jan@localhost jan   none    subscribe       group1;group2
    tom@localhost tom   none    subscribe       group3
    

    ejabberdctl help improved

    ejabberd supports around 200 administrative commands, and probably you consult them in the ejabberd Docs -> API Reference page, where all the commands documentation is perfectly displayed…

    The ejabberdctl command-line script already allowed to consult the commands documentation, consulting in real-time your ejabberd server to show you exactly the commands that are available. But it lacked some details about the commands. That has been improved, and now ejabberdctl shows all the information, including arguments description, examples and version notes.

    For example, the connected_users_vhost command documentation as seen in the ejabberd Docs site is equivalently visible using ejabberdctl :

    $ ejabberdctl help connected_users_vhost
      Command Name: connected_users_vhost
    
      Arguments: host::binary : Server name
    
      Result: connected_users_vhost::[ sessions::string ]
    
      Example: ejabberdctl connected_users_vhost "myexample.com"
               user1@myserver.com/tka
               user2@localhost/tka
    
      Tags: session
    
      Module: mod_admin_extra
    
      Description: Get the list of established sessions in a vhost
    

    Experimental support for Erlang/OTP 27

    Erlang/OTP 27.0-rc1 was recently released, and ejabberd can be compiled with it. If you are developing or experimenting with ejabberd, it would be great if you can use Erlang/OTP 27 and report any problems you find. For production servers, it’s recommended to stick with Erlang/OTP 26.2 or any previous version.

    In this sense, the rebar and rebar3 binaries included with ejabberd are also updated: now they support from Erlang 24 to Erlang 27. If you want to use older Erlang versions from 20 to 23, there are compatible binaries available in git: rebar from ejabberd 21.12 and rebar3 from ejabberd 21.12 .

    Of course, if you have rebar or rebar3 already installed in your system, it’s preferable if you use those ones, because probably they will be perfectly compatible with whatever erlang version you have installed.

    Installers and ejabberd container image

    The binary installers now include the recent and stable Erlang/OTP 26.2.2 and Elixir 1.16.1. Many other dependencies were updated in the installers, the most notable is OpenSSL that has jumped to version 3.2.1.

    The ejabberd container image and the ecs container image have gotten all those version updates, and also Alpine is updated to 3.19.

    By the way, this container image already had support to run commands when the container starts … And now you can setup the commands to allow them fail, by prepending the character ! .

    Summary of compilation methods

    When compiling ejabberd from source code, you may have noticed there are a lot of possibilities. Let’s take an overview before digging in the new improvements:

    • Tools to manage the dependencies and compilation:
      • Rebar : it is nowadays very obsolete, but still does the job of compiling ejabberd
      • Rebar3 : the successor of Rebar, with many improvements and plugins, supports hex.pm and Elixir compilation
      • Mix : included with the Elixir programming language , supports hex.pm, and erlang compilation
    • Installation methods:
      • make install : copies the files to the system
      • make prod : prepares a self-contained OTP production release in _build/prod/ , and generates a tar.gz file. This was previously named make rel
      • make dev : prepares quickly an OTP development release in _build/dev/
      • make relive : prepares the barely minimum in _build/relive/ to run ejabberd and starts it
    • Start scripts and alternatives:
      • ejabberdctl with erlang shell: start / foreground / live
      • ejabberdctl with elixir shell: iexlive
      • ejabberd console / start (this script is generated by rebar3 or mix, and does not support ejabberdctl configurable options)

    For example:
    – the CI dynamic tests use rebar3 , and Runtime tries to test all the possible combinations
    – ejabberd binary installers are built using: mix + make prod
    container images are built using: mix + make prod too, and started with ejabberdctl foreground

    Several combinations didn’t work correctly until now and have been fixed, for example:
    mix + make relive
    mix + make prod/dev + ejabberdctl iexlive
    mix + make install + ejabberdctl start/foregorund/live
    make uninstall buggy has an experimental alternative: make uninstall-rel
    rebar + make prod with Erlang 26

    Use Mix or Rebar3 by default instead of Rebar to compile ejabberd

    ejabberd uses Rebar to manage dependencies and compilation since ejabberd 13.10 4d8f770 . However, that tool is obsolete and unmaintained since years ago, because there is a complete replacement:

    Rebar3 is supported by ejabberd since 20.12 0fc1aea . Among other benefits, this allows to download dependencies from hex.pm and cache them in your system instead of downloading them from git every time, and allows to compile Elixir files and Elixir dependencies.

    In fact, ejabberd can be compiled using mix (a tool included with the Elixir programming language ) since ejabberd 15.04 ea8db99 (with improvements in ejabberd 21.07 4c5641a )

    For those reasons, the tool selection performed by ./configure will now be:
    – If --with-rebar=rebar3 but Rebar3 not found installed in the system, use the rebar3 binary included with ejabberd
    – Use the program specified in option: --with-rebar=/path/to/bin
    – If none is specified, use the system mix
    – If Elixir not found, use the system rebar3
    – If Rebar3 not found, use the rebar3 binary included with ejabberd

    Removed Elixir support in Rebar

    Support for Elixir 1.1 was added as a dependency in commit 01e1f67 to ejabberd 15.02 . This allowed to compile Elixir files. But since Elixir 1.4.5 (released Jun 22, 2017) it isn’t possible to get Elixir as a dependency… it’s nowadays a standalone program. For that reason, support to download old Elixir 1.4.4 as a dependency has been removed.

    When Elixir support is required, better simply install Elixir and use mix as build tool:

    ./configure --with-rebar=mix
    

    Or install Elixir and use the experimental Rebar3 support to compile Elixir files and dependencies:

    ./configure --with-rebar=rebar3 --enable-elixir
    

    Added Elixir support in Rebar3

    It is now possible to compile ejabberd using Rebar3 and support Elixir compilation. This compiles the Elixir files included in ejabberd’s lib/ path. There’s also support to get dependencies written in Elixir, and it’s possible to build OTP releases including Elixir support.

    It is necessary to have Elixir installed in the system, and configure the compilation using --enable-elixir . For example:

    apt-get install erlang erlang-dev elixir
    git clone https://github.com/processone/ejabberd.git ejabberd
    cd ejabberd
    ./autogen.sh
    ./configure --with-rebar=rebar3 --enable-elixir
    make
    make dev
    _build/dev/rel/ejabberd/bin/ejabberdctl iexlive
    

    Elixir versions supported

    Elixir 1.10.3 is the minimum supported, but:
    – Elixir 1.10.3 or higher is required to build an OTP release with make prod or make dev
    – Elixir 1.11.4 or higher is required to build an OTP release if using Erlang/OTP 24 or higher
    – Elixir 1.11.0 or higher is required to use make relive
    – Elixir 1.13.4 with Erlang/OTP 23.0 are the lowest versions tested by Runtime

    For all those reasons, if you want to use Elixir, it is highly recommended to use Elixir 1.13.4 or higher with Erlang/OTP 23.0 or higher.

    make rel is renamed to make prod

    When ejabberd started to use Rebar2 build tool, that tool could create an OTP release, and the target in Makefile.in was conveniently named make rel .

    However, newer tools like Rebar3 and Elixir’s Mix support creating different types of releases: production, development, … In this sense, our make rel target is nowadays more properly named make prod .

    For backwards compatibility, make rel redirects to make prod .

    New make install-rel and make uninstall-rel

    This is an alternative method to install ejabberd in the system, based in the OTP release process. It should produce exactly the same results than the existing make install .

    The benefits of make install-rel over the existing method:
    – this uses OTP release code from rebar/rebar3/mix, and consequently requires less code in our Makefile.in
    make uninstall-rel correctly deletes all the library files

    This is still experimental, and it would be great if you are able to test it and report any problem; eventually this method could replace the existing one.

    Just for curiosity:
    – ejabberd 13.03-beta1 got support for make uninstall was added
    ejabberd 13.10 introduced Rebar build tool and code got more modular
    – ejabberd 15.10 started to use the OTP directory structure for ‘make install’ , and this broke make uninstall

    Acknowledgments

    We would like to thank the contributions to the source code, documentation, and translation provided for this release by:

    And also to all the people contributing in the ejabberd chatroom, issue tracker…

    Improvements in ejabberd Business Edition

    Customers of the ejabberd Business Edition , in addition to all those improvements and bugfixes, also get:

    Push

    • Fix clock issue when signing Apple push JWT tokens
    • Share Apple push JWT tokens between nodes in cluster
    • Increase allowed certificates chain depth in GCM requests
    • Use x:oob data as source for image delivered in pushes
    • Process only https urls in oob as images in pushes
    • Fix jid in disable push iq generated by GCM and Webhook service
    • Add better logging for TooManyProviderTokenUpdated error
    • Make get_push_logs command generate better error if mod_push_logger not available
    • Add command get_push_logs that can be used to retrieve info about recent pushes and errors reported by push services
    • Add support for webpush protocol for sending pushes to safari/chrome/firefox browsers

    MAM

    • Expand mod_mam_http_access API to also accept range of messages

    MUC

    • Update mod_muc_state_query to fix subject_author room state field
    • Fix encoding of config xdata in mod_muc_state_query

    PubSub

    • Allow pubsub node owner to overwrite items published by other persons (p1db)

    ChangeLog

    This is a more detailed list of changes in this ejabberd release:

    Core

    • Added Matrix gateway in mod_matrix_gw
    • Support SASL2 and Bind2
    • Support tls-server-end-point channel binding and sasl2 codec
    • Support tls-exporter channel binding
    • Support XEP-0474: SASL SCRAM Downgrade Protection
    • Fix presenting features and returning results of inline bind2 elements
    • disable_sasl_scram_downgrade_protection : New option to disable XEP-0474
    • negotiation_timeout : Increase default value from 30s to 2m
    • mod_carboncopy: Teach how to interact with bind2 inline requests

    Other

    • ejabberdctl: Fix startup problem when having set EJABBERD_OPTS and logger options
    • ejabberdctl: Set EJABBERD_OPTS back to "" , and use previous flags as example
    • eldap: Change logic for eldap tls_verify=soft and false
    • eldap: Don’t set fail_if_no_peer_cert for eldap ssl client connections
    • Ignore hints when checking for chat states
    • mod_mam: Support XEP-0424 Message Retraction
    • mod_mam: Fix XEP-0425: Message Moderation with SQL storage
    • mod_ping: Support XEP-0198 pings when stream management is enabled
    • mod_pubsub: Normalize pubsub max_items node options on read
    • mod_pubsub: PEP nodetree: Fix reversed logic in node fixup function
    • mod_pubsub: Only care about PEP bookmarks options when creating node from scratch

    SQL

    • MySQL: Support sha256_password auth plugin
    • ejabberd_sql_schema: Use the first unique index as a primary key
    • Update SQL schema files for MAM’s XEP-0424
    • New option sql_flags : right now only useful to enable mysql_alternative_upsert

    Installers and Container

    • Container: Add ability to ignore failures in execution of CTL_ON_* commands
    • Container: Update to Erlang/OTP 26.2, Elixir 1.16.1 and Alpine 3.19
    • Container: Update this custom ejabberdctl to match the main one
    • make-binaries: Bump OpenSSL 3.2.1, Erlang/OTP 26.2.2, Elixir 1.16.1
    • make-binaries: Bump many dependency versions

    Commands API

    • print_sql_schema : New command available in ejabberdctl command-line script
    • ejabberdctl: Rework temporary node name generation
    • ejabberdctl: Print argument description, examples and note in help
    • ejabberdctl: Document exclusive ejabberdctl commands like all the others
    • Commands: Add a new muc_sub tag to all the relevant commands
    • Commands: Improve syntax of many commands documentation
    • Commands: Use list arguments in many commands that used separators
    • Commands: set_presence : switch priority argument from string to integer
    • ejabberd_commands: Add the command API version as a tag vX
    • ejabberd_ctl: Add support for list and tuple arguments
    • ejabberd_xmlrpc: Fix support for restuple error response
    • mod_http_api: When no specific API version is requested, use the latest

    Compilation with Rebar3/Elixir/Mix

    • Fix compilation with Erlang/OTP 27: don’t use the reserved word ‘maybe’
    • configure: Fix explanation of --enable-group option ( #4135 )
    • Add observer and runtime_tools in releases when --enable-tools
    • Update “make translations” to reduce build requirements
    • Use Luerl 1.0 for Erlang 20, 1.1.1 for 21-26, and temporary fork for 27
    • Makefile: Add install-rel and uninstall-rel
    • Makefile: Rename make rel to make prod
    • Makefile: Update make edoc to use ExDoc, requires mix
    • Makefile: No need to use escript to run rebar|rebar3|mix
    • configure: If --with-rebar=rebar3 but rebar3 not system-installed, use local one
    • configure: Use Mix or Rebar3 by default instead of Rebar2 to compile ejabberd
    • ejabberdctl: Detect problem running iex or etop and show explanation
    • Rebar3: Include Elixir files when making a release
    • Rebar3: Workaround to fix protocol consolidation
    • Rebar3: Add support to compile Elixir dependencies
    • Rebar3: Compile explicitly our Elixir files when --enable-elixir
    • Rebar3: Provide proper path to iex
    • Rebar/Rebar3: Update binaries to work with Erlang/OTP 24-27
    • Rebar/Rebar3: Remove Elixir as a rebar dependency
    • Rebar3/Mix: If dev profile/environment, enable tools automatically
    • Elixir: Fix compiling ejabberd as a dependency ( #4128 )
    • Elixir: Fix ejabberdctl start/live when installed
    • Elixir: Fix: FORMATTER ERROR: bad return value ( #4087 )
    • Elixir: Fix: Couldn’t find file Elixir Hex API
    • Mix: Enable stun by default when vars.config not found
    • Mix: New option vars_config_path to set path to vars.config ( #4128 )
    • Mix: Fix ejabberdctl iexlive problem locating iex in an OTP release

    Full Changelog

    https://github.com/processone/ejabberd/compare/23.10…24.02

    ejabberd 24.02 download & feedback

    As usual, the release is tagged in the Git source code repository on GitHub .

    The source package and installers are available in ejabberd Downloads page. To check the *.asc signature files, see How to verify ProcessOne downloads integrity .

    For convenience, there are alternative download locations like the ejabberd DEB/RPM Packages Repository and the GitHub Release / Tags .

    The ecs container image is available in docker.io/ejabberd/ecs and ghcr.io/processone/ecs . The alternative ejabberd container image is available in ghcr.io/processone/ejabberd .

    If you consider that you’ve found a bug, please search or fill a bug report on GitHub Issues .

    The post ejabberd 24.02 first appeared on ProcessOne .
    • chevron_right

      JMP: Mobile-friendly Gateway to any SIP Provider

      news.movim.eu / PlanetJabber · Thursday, 22 February - 17:37 · 2 minutes

    We have for a long time supported the public Cheogram SIP instance, which allows easy interaction between the federated Jabber network and the federated SIP network. When it comes to connecting to the phone network via a SIP provider, however, very few of these providers choose to interact with the federated SIP network at all. It has always been possible to work around this with a self-hosted PBX , but documentation on the best way to do this is scant. We have also heard from some that they would like hosting the gateway themselves to be easier, as increasingly people are familiar with Docker and not with other packaging formats. So, we have sponsored the development of a Docker packaging solution for the full Cheogram SIP solution, including an easy ability to connect to an unfederated SIP server

    XMPP Server

    First of all, in order to self-host a gateway speaking the XMPP protocol on one side, you’ll need an XMPP server. We suggest Prosody , which is already available from many operating systems. While a full Prosody self-hosting tutorial is out of scope here, the relevant configuration to add looks like this:

    Component "asterisk"
        component_secret = "some random secret 1"
        modules_disabled = { "s2s" }
    Component "sip"
        component_secret = "some random secret 2"
        modules_disabled = { "s2s" }

    Note that, especially if you are going to set the gateway up with access to your private SIP account at some provider, you almost certaintly do not want either of these federated. So no DNS setup is needed, nor do the component names need to be real hostnames. The rest of this guide will assume you’ve used the names here.

    If you don’t use Prosody, configuration for most other XMPP servers should be similar.

    Run Docker Image

    You’ll need to pull the Docker image:

    docker pull singpolyma/cheogram-sip:latest

    Then run it like this:

    docker run -d \
        --network=host \
        -e COMPONENT_DOMAIN=sip \
        -e COMPONENT_SECRET="some random secret 2" \
        -e ASTERISK_COMPONENT_DOMAIN=asterisk \
        -e ASTERISK_COMPONENT_SECRET="some random secret 1" \
        -e SIP_HOST=sip.yourprovider.example.com \
        -e SIP_USER=your_sip_username \
        -e SIP_PASSWORD=your_sip_password \
        -e SIP_JID=your-jabber-id@yourdomain.example.com \
        singpolyma/cheogram-sip:latest

    If you just want to connect with the federated SIP network, you can leave off the SIP_HOST , SIP_USER , SIP_PASSWORD , and SIP_JID . If you are using a private SIP provider for connecting to the phone network, then fill in those values with the connection information for your provider, and also your own Jabber ID so it knows where to send calls that come in to that SIP address.

    Make a Call

    You can now make a call to any federated SIP address at them\40theirdomain.example.com@sip and to any phone number at +15551234567@sip which wil route via your configured SIP provider.

    You should even be able to use the dialler in Cheogram Android:

    Cheogram Android Dialler Cheogram Android Dialler

    Inbound calls will route to your Jabber ID automatically as well.

    What About SMS?

    Cheogram SIP does have some basic support for SIP MESSAGE protocol, so if your provider has that it may work, but more testing and polish is needed since this is not a very common feature at providers we have tested with.

    Where to Learn More

    If you have any questions or feedback of any kind, don’t hesistate to stop by the project channel which you can get on the web or using your Jabber ID .

    • wifi_tethering open_in_new

      This post is public

      blog.jmp.chat /b/mobile-friendly-sip-gateway